This article shows you how to create and use a C# socket client application that enables you to access CNCnetPDM and read/write data from/to your machines.
The client uses asynchronous sockets:
These sockets do not suspend your application while waiting for network operations to complete. It uses the standard .NET Framework asynchronous programming model to process the network connection on one thread while your application can continue to run on the original thread. Asynchronous sockets are appropriate for applications that make heavy use of the network or that cannot wait for network operations to complete before continuing.
The sample project (Visual Studio 2017) MTConnectCLI is a windows form program that connects to CNCnetPDM, outputs device data and allows you to control your equipment by setting or changing parameters or variables. In addition it allows you to control various features of CNCnetPDM. It requires .NET 2.0 components to be installed on your PC.
DOWNLOAD SOURCE FILES
PROJECT DESCRIPTION
CONNECT TO SERVER
By using the following code the client connects to CNCnetPDM which acts as the socket server when the connect button is pressed:
private void m_btnConnect_Click(object sender, System.EventArgs e)
{
	Cursor cursor = Cursor.Current;
	Cursor.Current = Cursors.WaitCursor;
	try
	{
		// Close the socket if it is still open
		if( m_sock != null && m_sock.Connected )
		{
			m_sock.Shutdown( SocketShutdown.Both );
			System.Threading.Thread.Sleep( 10 );
			m_sock.Close();
		}

		// Create the socket object
		m_sock = new Socket( AddressFamily.InterNetwork, SocketType.Stream, ProtocolType.Tcp );

		// Define the Server address and port
		int iPort = int.Parse(m_tbServerPort.Text);
		IPEndPoint epServer = new IPEndPoint(  IPAddress.Parse( m_tbServerAddress.Text ), iPort );

		// Connect to server non-Blocking method
		m_sock.Blocking = false;
		AsyncCallback onconnect = new AsyncCallback( OnConnect );
		m_sock.BeginConnect( epServer, onconnect, m_sock );
	}
	catch( Exception ex )
	{
		MessageBox.Show( this, ex.Message, "Server Connect failed!" );
	}
	Cursor.Current = cursor;
}
FIG.2: Connect to server
If the connection already exists it is destroyed. Then, a socket is created and an end point established. Note that, although this code attempts a non-blocking connection the connection will block until the remote PC name is resolved into an IP address. To avoid this it’s better to use the IPV4 address instead of the DNS Hostname of the server.
The following method is called once the connection attempt is complete, it displays connection error or sets up the receive data callback if successful.
public void OnConnect( IAsyncResult ar )
{
	// Socket was the passed in object
	Socket sock = (Socket)ar.AsyncState;

	// Check if sucessfull
	try
	{
		if( sock.Connected )
			SetupRecieveCallback( sock );
		else
			MessageBox.Show( this, "Unable to connect to remote PC", "Connect Failed!" );
	}
	catch( Exception ex )
	{
		MessageBox.Show( this, ex.Message, "Unknown error on Connect!" );
	}
}
FIG.3: Handle connection attempt
RECEIVE DATA
To receive data asynchronously, it is necessary to setup an AsyncCallback to handle events triggered by the socket such as new data and loss of connection. This is done by using the following method:
The SetupRecieveCallback method starts a BeginReceive using a delegate pointing to the OnReceveData method that follows. It also passes a buffer for the receive data to be inserted into:
public void OnRecievedData( IAsyncResult ar )
{
	Socket sock = (Socket)ar.AsyncState;

	// Check if any data was received
	try
	{
		int nBytesRec = sock.EndReceive( ar );
		if( nBytesRec > 0 )
		{
			// Add the data to the List
			string sRecieved = Encoding.ASCII.GetString( m_byBuff, 0, nBytesRec );

			// WARNING : The following line is NOT thread safe. Invoke is
			// m_lbRecievedData.Items.Add( sRecieved );
			Invoke( m_AddMessage, new string [] { sRecieved } );

			// If the connection is still usable restablish the callback
			SetupRecieveCallback( sock );
		}
		else
		{
			// If no data was recieved then the connection is probably dead
			Console.WriteLine( "Client {0}, disconnected", sock.RemoteEndPoint );
			sock.Shutdown( SocketShutdown.Both );
			sock.Close();
		}
	}
	catch( Exception ex )
	{
		MessageBox.Show( this, ex.Message, "Unknown error on Recieve!" );
	}
}
FIG.5: Handle received data
When the above event is fired the receive data is assumed to be ASCII. The new data is sent to the display by invoking a delegate. Although it is possible to call Add() on the list to display the new data, it is a bad idea because the received data will most likely be running in another thread. Note the receive callback must also be re-established to continue to receive more events. Even if more data was received than can be placed in the input buffer, re-establishing the receive callback will cause it to trigger until all data has been read.
The AddMessage delegate is created to decouple the socket thread from the user interface thread as follows:
// Declare the delegate prototype to send data back to the form
delegate void AddMessage( string sNewMessage );
namespace MTConnect
{
	public class FormMain : System.Windows.Forms.Form
	{
		// ...
		private event AddMessage	m_AddMessage; // Add Message Event handler for Form
		// ...
		public FormMain()
		{
			// ...
			// Add Message Event handler for Form decoupling from input thread
			m_AddMessage = new AddMessage( OnAddMessage );
			// ...
		}

		public void OnAddMessage( string sMessage )
		{
			m_lbRecievedData.Items.Add( sMessage );
		}
	}
}
FIG.6: Create AddMessage delegate
FORMAT DATA
When data is received or is to be sent the data is held in an array of 8 bit bytes. This data must be encoded to a format suitable for .NET when received and a format suitable for the receiving application when sent. C# uses a multi-byte (MBCS) character encoding internally so data must be converted to that when it is received and before it is sent out using the Encoding.ASCII or Encoding.UNICODE static methods as necessary.
PROGRAM USAGE
To test the program you can follow these steps:
Setup a simple instance of CNCnetPDM with two devices (number 1000 and 1001) that just output states and part counts as described in section ‘Configure CNCnetPDM’ of ‘MTConnect Getting Started’ on your PC and let it run.
Build the C-Sharp client and run it on your PC. You can also run the compiled program from the Debug folder.
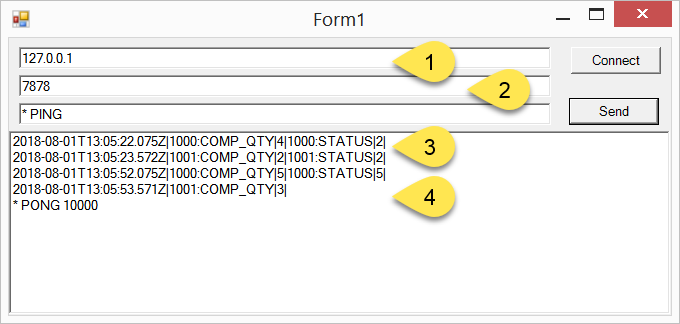
PROGRAM OUTPUT
FIG 7: Initial client output
If you leave IP Address (1) and Port (2) at its default settings and click [Connect] the program first outputs state number and part count for each machine. A description of the output format can be found in section ‘Adapter Output’ of ‘MTConnect Getting Started’.
Subsequently the server only outputs items that have changed (3) to the specific client. If you run a second instance of the client the server again outputs all data followed by changed items only to this client instance.
PROGRAM INPUT
From your client you can pass several commands to the server to control it as well as the machines connected to it. To send a command to the server you just have to input it into the textbox left to button [Send] followed by clicking [Send].