CNCnetPDM OPC DA for Siemens Sinumerik 840D controllers enables you acquisition and monitoring of machine-, process- and quality-data from machines with Sinumerik controllers from a remote PC. It also allows to write and change parameter values on these devices.
This document describes setup and test of data acquisition and writing of parameter values from/to Sinumerik controllers that use OPC Classic which is most likely the case if your controller has a Microsoft Windows OS and does NOT run Sinumerik Operate >= Version 4.5.
To directly read/write data from/to machines with Sinumerik 840D controllers connected to CNCnetPDM with your applications you can use our free Open Source Client (C-Sharp)
It is recommended that you turn off simple sharing: Click Start->Run type in eplorer.exe click on Tools->Folder Options. In tab View uncheck ‘Use simple file sharing (Recommended)’. Click OK.
If you have the firewall enabled at the controller proceed as follows: The most simple way to avoid communication problems is to turn off the firewall. Click on Start->Settings->Control Panel->Windows Firewall. Click on Off (not recommended) followed by OK. You’re done.
If you want to keep the firewall switched on you have to adjust some settings.
Add Port 135 to exceptions
Check ‘File and Printer Sharing’
Add program ‘Simatic OPC Server’ (..\mmc2\opc\dataaccess\SOPC_MachineSwitch.exe)*
Click OK
* Depending on the setup of your controller these files may be stored at a different location.
FIG 2: Firewall settings on Sinumerik 840D
Restart the controller in normal mode to enable HMI again.
PC SETUP
DCOM GENERAL
Either click on Start->Programs->Administrative Tools->Component Services or Start->Run and type in dcomcnfg and click OK
Expand Component Services->Computers->My Computer
Right click My Computer select Properties
Open tab Default Properties
Make sure that Enable Distributed COM on this computer is checked
Important: In case your PC runs an Operating System > XP, e.g. Windows 7 AND the controller PC runs Operating System Windows NT 4.0 you mandatorily have to set 'Default Authentication Level' in tab 'Default Properties' to 'None' otherwise you just get an 'Access denied' output from the test programs and the device driver! You also have to reboot your PC for these changes to take effect.
NETWORK ACCESS TO CONTROLLER
For successful communication between PC and controller it is necessary that the querying computer is able to access the controller and its Operating System via the network with proper credentials!
Typically the account you’re using on your PC does NOT have the rights to access the controller. To resolve this you need to setup an additional account:
Right click ‘This PC’ on your desktop and select Manage
Expand Local Users and Groups
Right click on ‘Users’ and select ‘New User’
In ‘User name’ enter ‘auduser’ (without quotes)
In ‘Password’ enter the password for user ‘auduser’ used at the controller, (typically ‘SUNRISE’)
Confirm the password, uncheck ‘User must change password at next logon’, click button Create followed by Close
Right click on username ‘auduser’, select Properties
In tab ‘Member Of’ click button Add and type in Administrators, click button Check Names followed by OK
Close the Properties dialog by clicking on OK
Test access to your controller:
Open Windows Explorer (%SYSTEMROOT%\explorer.exe) on your PC
In the address field input two backslash characters followed by the IP Address or DNS Hostname of your controller e.g. \\192.168.1.100 and press Enter
You should be asked for credentials: Enter username ‘auduser’ and its password
If no errors show up you have successfully tested access to the device
DOWNLOAD SOFTWARE
LICENSING
If you have installed CNCnetPDM on your PC with a license other than a ‘free license’ and run this program from the folder where CNCnetPDM is installed you can modify all OPC Items. Otherwise you can monitor, read and write all predefined OPC items. Please see licensing for details or contact us if you have any questions.
Note: If you like to run this program from a different location on your PC you can simply copy your CNCnetPDM.ini file to this directory.
SOFTWARE SETUP & USAGE (PC)
Extract all files from Sinumerik_840D_OPC_DA.zip to a folder on your PC.
If you use a firewall on your PC or your company network you have to add an Inbound Rule that allows program CNCnetPDM.OpcDA.SimpleClient.exe (1) to use any port (2) as ports for OPC Classic communication are dynamically assigned by design.
FIG 3: Firewall exception for program CNCnetPDM.OpcDA.SimpleClient
Note: The program requires .NET Framework 2 components to be installed on your PC.
Note: If your PC does NOT have any OPC programs installed you need to install the x86 version of the OPC core components:
CNCnetPDM OPC DA CLIENT
The program enables you to connect to your controller via OPC DA (Classic), monitor, read and write items.
Right click CNCnetPDM.OpcDA.SimpleClient.exe with the shift key pressed and select ‘Run as different user’. Enter user name ‘auduser’ and its password.
In CNCnetPDM.OpcDA.SimpleClient.exe enter the DNS Hostname or IP Address of your controller into the textbox right to [Connect] (1).
FIG 5: Connect CNCnetPDM.OpcDA.SimpleClient
Click [Connect] you now should be connected to the OPC DA server on your controller.
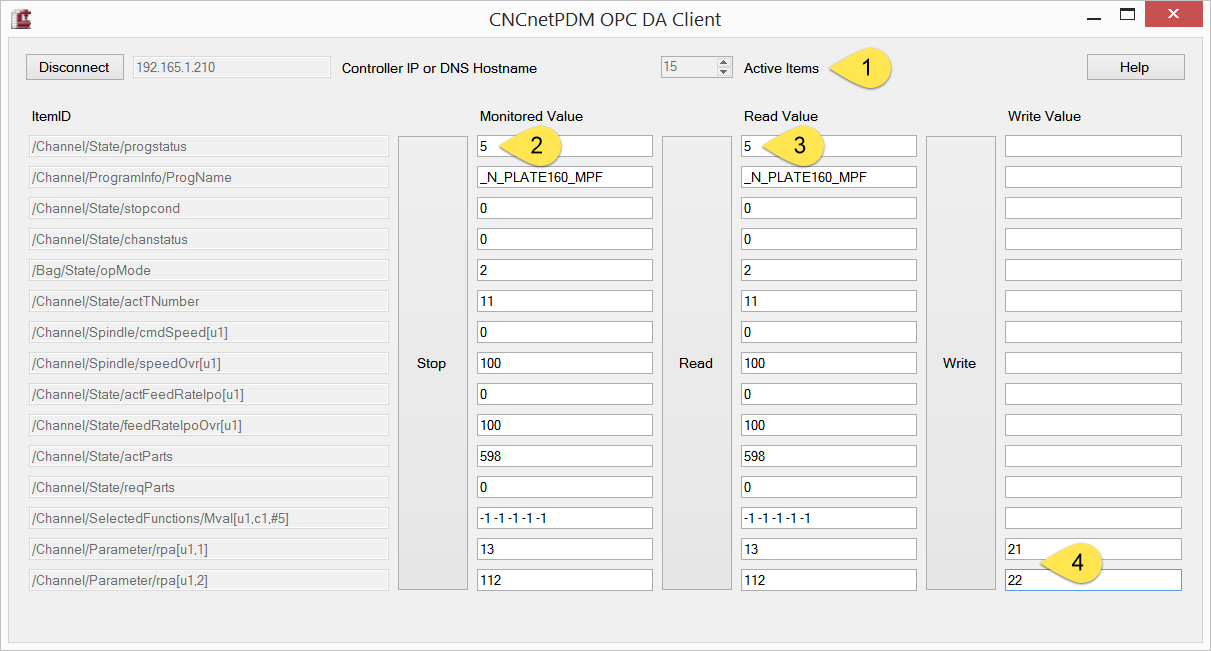
FIG 6: CNCnetPDM.OpcDA.SimpleClient
Initially one item is queried, by changing ‘Active Items’ (1) to a different value you can activate up to 15 items.
The 15 predefined values under ‘ItemID’ are known to work well on most controllers. With a licensed version you can change them according to your requirements. The last two items are 2 writable R Parameters (user variables) that are visible at the controller: [MENU SELECT] -> [Tools Zerooffs] -> [R Variable].
If you click on button Read (3) the values of all active items are queried from the controller and shown in the dialog.
For the last two variables R1 and R2 you see their current values as set at the controller.
By entering different values for these two writable items and clicking on [Write] (4) you can change their values at the controller.
Clicking on [Monitor] (2) adds all active variables to a subscription and shows their current value.
Note: In the zip archive you can also find file ‘Querieable_Values.txt’ that contains a list with 1630 variables that can be queried from Sinumerik 840D controllers.
If you’re done, click on [Disconnect].
TROUBLESHOOTING
In case of errors the program outputs an error log file that can be found in the directory where the program is located. This file contains detailed information about any errors.
If you see a popup window with CoCreateInstanceEx: Access is denied make sure that you run the program as user ‘auduser’.
If you see a popup window with CoCreateInstanceEx: The RPC server is unavailable check that the controller is running, you typed in the correct IP Address and you configured your firewall correctly.
If you see values like Exception from HRESULT: 0x… in one of the output fields when reading or monitoring check that you typed in the item id correctly. In case of writing check that the item is writable e.g. a r-parameter and you didn’t type in an improper format e.g. alphanumeric instead of numeric.
SERVICE MODE
Steps for booting the PCU in service mode:
Switch on the PCU.
When the prompt 'Please select the operating system to start:' is displayed, press the KEY until the line below SINUMERIK is highlighted in white.
Confirm the selection by pressing the INPUT KEY.
The service menu opens:
FIG 7: Service menu
Select the menu option: 4 Start Windows (Service Mode).
Then select the menu option:
Standard Windows (without starting SINUMERIK HMI)
The PCU restarts.
When prompted to enter "Password:" Enter your service password (default: SUNRISE)
This password authorizes you to make extensive changes to the control. The password must be entered in upper case letters.
After the PCU has booted in service mode you can configure MS Windows components.