NewsCNCnetPDMAbout usSupport
  

READ & WRITE DATA | MITSUBISHI

TOP

For manufacturing machines equipped with Mitsubishi controllers this diagnostic tool enables you to test reading and writing operations by using all available commands for these devices. It enables to quickly setup customized Mitsubishi device driver INI files for CNCnetPDM. The program can be executed on a PC with MS Windows OS (>= XP SP3) connected to your controller via Ethernet. It can be used for machines other than from Citizen or Mazak.

SOFTWARE DOWNLOAD | SETUP | READ DATA | WRITE DATA | LICENSING | CONTROLLERS

Software Download

SETUP

  • Download and extract all contents of mitsubishicommands.zip to a folder on your PC
  • In this folder open file melcfg.ini with a text editor and scroll down to section [HOSTS].
  • melcfg.ini comes with predefined entries for up to 54 machines, every line in section [HOSTS] contains Mitsubishi machine number (the number after TCP), IP Address and TCP Port of a single machine.
  • Replace the default IP Address 192.168.1.100 with the IP Address of your controller, note down the machine number and save the file. If, for example, the IP Address of your first controller is 192.168.1.2 the line should look like
    TCP1=192.168.1.2,683

Default melcfg.ini file

; CNCnetPDM Standard Mitsubishi INI
; Controller=M7NX (default), M8NX, NCXJ, NCXK, M6B or NX

[Machine01]
Controller=M7NX
Device=TCP1
CacheEnable=0
[Machine02]
Device=TCP2
Controller=M7NX
CacheEnable=0
[Machine03]
Device=TCP3
Controller=M7NX
CacheEnable=0
[Machine04]
Device=TCP4
Controller=M7NX
CacheEnable=0
[Machine05]
Device=TCP5
Controller=M7NX
CacheEnable=0
[Machine06]
Device=TCP6
Controller=M7NX
CacheEnable=0
[Machine07]
Device=TCP7
Controller=M7NX
CacheEnable=0
[Machine08]
Device=TCP8
Controller=M7NX
CacheEnable=0
[Machine09]
Device=TCP9
Controller=M7NX
CacheEnable=0
[Machine0A]
Device=TCP10
Controller=M7NX
CacheEnable=0
[Machine0B]
Device=TCP11
Controller=M7NX
CacheEnable=0
[Machine0C]
Device=TCP12
Controller=M7NX
CacheEnable=0
[Machine0D]
Device=TCP13
Controller=M7NX
CacheEnable=0
[Machine0E]
Device=TCP14
Controller=M7NX
CacheEnable=0
[Machine0F]
Device=TCP15
Controller=M7NX
CacheEnable=0
[Machine10]
Device=TCP16
Controller=M7NX
CacheEnable=0
[Machine11]
Device=TCP17
Controller=M7NX
CacheEnable=0
[Machine12]
Device=TCP18
Controller=M7NX
CacheEnable=0
[Machine13]
Device=TCP19
Controller=M7NX
CacheEnable=0
[Machine14]
Device=TCP20
Controller=M7NX
CacheEnable=0
[Machine15]
Device=TCP21
Controller=M7NX
CacheEnable=0
[Machine16]
Device=TCP22
Controller=M7NX
CacheEnable=0
[Machine17]
Device=TCP23
Controller=M7NX
CacheEnable=0
[Machine18]
Device=TCP24
Controller=M7NX
CacheEnable=0
[Machine19]
Device=TCP25
Controller=M7NX
CacheEnable=0
[Machine1A]
Device=TCP26
Controller=M7NX
CacheEnable=0
[Machine1B]
Device=TCP27
Controller=M7NX
CacheEnable=0
[Machine1C]
Device=TCP28
Controller=M7NX
CacheEnable=0
[Machine1D]
Device=TCP29
Controller=M7NX
CacheEnable=0
[Machine1E]
Device=TCP30
Controller=M7NX
CacheEnable=0
[Machine1F]
Device=TCP31
Controller=M7NX
CacheEnable=0
[Machine20]
Device=TCP32
Controller=M7NX
CacheEnable=0
[Machine21]
Device=TCP33
Controller=M7NX
CacheEnable=0
[Machine22]
Device=TCP34
Controller=M7NX
CacheEnable=0
[Machine23]
Device=TCP35
Controller=M7NX
CacheEnable=0
[Machine24]
Device=TCP36
Controller=M7NX
CacheEnable=0
[Machine25]
Device=TCP37
Controller=M7NX
CacheEnable=0
[Machine26]
Device=TCP38
Controller=M7NX
CacheEnable=0
[Machine27]
Device=TCP39
Controller=M7NX
CacheEnable=0
[Machine28]
Device=TCP40
Controller=M7NX
CacheEnable=0
[Machine29]
Device=TCP41
Controller=M7NX
CacheEnable=0
[Machine2A]
Device=TCP42
Controller=M7NX
CacheEnable=0
[Machine2B]
Device=TCP43
Controller=M7NX
CacheEnable=0
[Machine2C]
Device=TCP44
Controller=M7NX
CacheEnable=0
[Machine2D]
Device=TCP45
Controller=M7NX
CacheEnable=0
[Machine2E]
Device=TCP46
Controller=M7NX
CacheEnable=0
[Machine2F]
Device=TCP47
Controller=M7NX
CacheEnable=0
[Machine30]
Device=TCP48
Controller=M7NX
CacheEnable=0
[Machine31]
Device=TCP49
Controller=M7NX
CacheEnable=0
[Machine32]
Device=TCP50
Controller=M7NX
CacheEnable=0
[Machine33]
Device=TCP51
Controller=M7NX
CacheEnable=0
[Machine34]
Device=TCP52
Controller=M7NX
CacheEnable=0
[Machine35]
Device=TCP53
Controller=M7NX
CacheEnable=0
[Machine36]
Device=TCP54
Controller=M7NX
CacheEnable=0

[CHGAPIVL]
NCXJ=NOCHANGE
NCXK=NOCHANGE
M6B=NOCHANGE
NX=CHGAPIVL.DLL
M7NX=CHGAPIVL.DLL
M7NX=CHGAPIVL.DLL

[NC Alarm Message]
NCXJ=NOCHANGE
NCXK=NOCHANGE
M6B=MELLANG.DLL
NX=NXALMSG.DLL
M7NX=NXALMSG.DLL
M7NX=NXALMSG.DLL

[PLC Message]
NCXJ=NOCHANGE
NCXK=NOCHANGE
M6B=PLCMSG.DLL
NX=NOCHANGE
M7NX=NOCHANGE
M7NX=NOCHANGE

[BACK GROUND]
NCXJ=NOCHANGE
NCXK=NOCHANGE
M6B=NOCHANGE
NX=NOCHANGE
M7NX=NOCHANGE
M7NX=NOCHANGE

[System]
EnableRemoteMode=1
LogType=-1

[HOSTS]
TCP1=192.168.1.100,683
TCP2=192.168.1.100,683
TCP3=192.168.1.100,683
TCP4=192.168.1.100,683
TCP5=192.168.1.100,683
TCP6=192.168.1.100,683
TCP7=192.168.1.100,683
TCP8=192.168.1.100,683
TCP9=192.168.1.100,683
TCP10=192.168.1.100,683
TCP11=192.168.1.100,683
TCP12=192.168.1.100,683
TCP13=192.168.1.100,683
TCP14=192.168.1.100,683
TCP15=192.168.1.100,683
TCP16=192.168.1.100,683
TCP17=192.168.1.100,683
TCP18=192.168.1.100,683
TCP19=192.168.1.100,683
TCP20=192.168.1.100,683
TCP21=192.168.1.100,683
TCP22=192.168.1.100,683
TCP23=192.168.1.100,683
TCP24=192.168.1.100,683
TCP25=192.168.1.100,683
TCP26=192.168.1.100,683
TCP27=192.168.1.100,683
TCP28=192.168.1.100,683
TCP29=192.168.1.100,683
TCP30=192.168.1.100,683
TCP31=192.168.1.100,683
TCP32=192.168.1.100,683
TCP33=192.168.1.100,683
TCP34=192.168.1.100,683
TCP35=192.168.1.100,683
TCP36=192.168.1.100,683
TCP37=192.168.1.100,683
TCP38=192.168.1.100,683
TCP39=192.168.1.100,683
TCP40=192.168.1.100,683
TCP41=192.168.1.100,683
TCP42=192.168.1.100,683
TCP43=192.168.1.100,683
TCP44=192.168.1.100,683
TCP45=192.168.1.100,683
TCP46=192.168.1.100,683
TCP47=192.168.1.100,683
TCP48=192.168.1.100,683
TCP49=192.168.1.100,683
TCP50=192.168.1.100,683
TCP51=192.168.1.100,683
TCP52=192.168.1.100,683
TCP53=192.168.1.100,683
TCP54=192.168.1.100,683

USAGE

READ DATA

  • After setup of your melcfg.ini file double click MitsubishiCommands in Windows Explorer
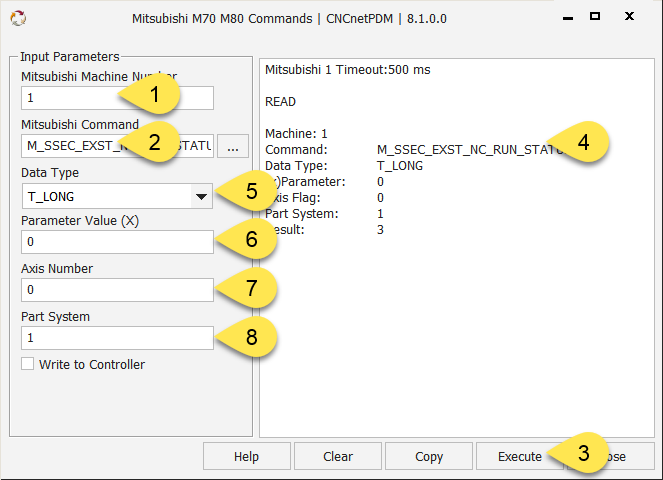
  • In field ‘Mitsubishi Machine Number’ (1) enter the machine number as defined in melcfg.ini
  • Initially the program starts with Mitsubishi Command (2) M_SSEC_EXST_NC_RUN_STATUS which returns the running status of the machine. You can also copy a command from a specific section f.i. 'Program execution status' and paste it into the input field by clicking on the button with 3 dots.
  • Clicking on button ‘Execute’ (3) shows the result of the operation, here 3, in the right area:

Read Mitsubishi Running Status

FIG 1:    Output of MitsubishiCommands (Read Running Status)

Data Type (5): Allows you to adjust the data type for the command according to the ‘Default Data Type’ mentioned in the documentation of the respective command.

Parameter Value (X) (6): For commands that require a parameter value e.g. a common variable number M_SSEC_CMVRS_DAT(x) you can enter it’s number here. Input this parameter for commands that end with (x).

Axis number (7): For axis related commands e.g. Axis Name M_SSEC_AXISPRM_NAME a specific axis number has to be entered here.

Part System (8): If your machine has two or more part systems you can input it's number here and query data from the selected system. To detect the number of part systems on your controller execute MitsubishiM70M80 and note down the value of 'Nr. Part Systems'.

  • Note: Command M_SSEC_CUR_ALARMS with Data Type T_ALM can be used to query up to 10 active alarms from each part system.

Query active alarms from Mitsubishi CNC

FIG 2:    Query active alarms from Mitsubishi CNC

WRITE DATA

MitsubishiCommands also allows you to change data at the controller by using commands with note ‘W’ or ‘RW’ in column R/W of their documentation e.g. M_SSEC_CMVRS_DAT(x).

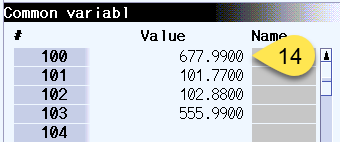
To change the value of common variable 100, proceed as follows:

  • In field Mitsubishi Command (9) type in M_SSEC_CMVRS_DAT(x). You can also copy the command name and paste it into this field by clicking on the button with 3 dots right of the input field
  • As Data Type (10) select T_FLOATBIN
  • In field Parameter Value (11) enter 100
  • Activate checkbox ‘Write to Controller’ (12) and enter the new value for variable 100 in the input field below
  • If your machine has more than 1 part systems and you'd like to write to a part system other than 1 you can target it by input of it's number in field 'Part System'
  • Clicking on button ‘Execute’ (13) changes the variable value and shows the result in the right area
  • You can verify the new value for common variable 100 at the controller (14)

Write to Mitsubishi CNC

FIG 3:    Change common variable 100 with MitsubishiCommands

Mitsubishi CNC Common variables

FIG 4:    Verify the new value for common variable 100 at the controller

LICENSING

If you have installed CNCnetPDM on your PC with a license other than a ‘free license’ and run this program from the folder where CNCnetPDM is installed you get unlimited functionality. Otherwise you can only read data and execute commands that require no additional input parameter (x). Please see licensing for details or contact us if you have any questions.

  • Note: If you like to run this program from a different folder on your PC you can simply copy your CNCnetPDM.ini file to this directory.

CONTROLLERS

The program was tested and works with the following controllers in production environments, others may work as well:

Series M800 M80

Machining center & Lathe system

  • M850W
  • M830W
  • M850S
  • M830S
  • M80W
  • M80 TypeA
  • M80 TypeB

Series E80 C80

Machining center & Lathe system

  • E80 TypeA
  • E80 TypeB
  • C80 TypeA
  • C80 TypeB

Series M70

Machining center & Lathe system

  • FCA70P-2A
  • FCA70P-4A
  • FCA70P-2B
  • FCA70P-4B

Series M700

  • 720M
  • 730M
  • 750M
  • 720L
  • 730L
  • 750L

Series C6/C64 Series

  • C6L
  • C6T
  • C64M
  • C64L
  • C64T

Series C70

  • M system
  • L system

Series M70V

Machining Center & Lathe system

  • TypeB
  • TypeA

Series M700V

Machining Center & Lathe system

  • M720VS
  • M730VS
  • M750VS
  • M720VW
  • M730VW
  • M750VW

Privacy notice

This website uses cookies. By continuing to use it you agree to our privacy policy. 

https://www.inventcom.net/support/mitsubishi/read-write-data

Support | Mitsubishi | Overview

CNCnetPDM for machines with Mitsubishi controllers allows you to acquire machine-, process and quality-data from these devices in near real time and use it for your business... [read more]
Support | Mitsubishi | Overview

Support | Mitsubishi | Release Notes

(8/5/2024) We released new versions of our Mitsubishi Industrial Internet of Things (IIoT) Adapter and the GUI programs to read/write from/to Mitsubishi controllers with... [read more]
Support | Mitsubishi | Release Notes

Support | Mitsubishi | Machine Data

To report machine data to your applications you have to be able to acquire it from your devices. For machines equipped with Mitsubishi controllers connected to your company... [read more]
Support | Mitsubishi | Machine Data

Support | Mitsubishi | Device Driver

This highly configurable Mitsubishi IIoT Adapter for CNCnetPDM enables you to acquire and output all items that can be read from Mitsubishi CNC controllers on machines other than... [read more]
Support | Mitsubishi | Device Driver

Support | Mitsubishi | Network Setup

This How-To article shows how to connect Mitsubishi M70/M700 and M80/M800 controllers to your company network. CABLE CONNECTION |... [read more]
Support | Mitsubishi | Network Setup
Modified: 2024-08-21