To be able to access the Siemens Sinumerik 840D built in OPC Classic DA (Data Access) or A&E (Alarm & Event) Servers from a remote PC that is member of a workgroup or a domain via Ethernet some configuration tasks are necessary.
For successful DCOM communication between local and controller PC it is necessary that the PC is able to access the controller via the network with proper credentials. Typically the account you’re using on your PC does not have the rights to access DCOM at the controller. To resolve this you need to setup an additional local account:
Right click ‘This PC’ on your desktop and select Manage
Expand Local Users and Groups
Right click on ‘Users’ and select ‘New User’
In ‘User name’ enter ‘auduser’ (without quotes)
In ‘Password’ enter the password for user ‘auduser’ used at the controller, (typically ‘SUNRISE’)
Confirm the password, uncheck ‘User must change password at next logon’, click button Create followed by Close
Right click on username ‘auduser’, select Properties
In tab ‘Member Of’ click button Add and type in Administrators, click button Check Names followed by OK
Close the Properties dialog by clicking on OK
ADD OPC CORE COMPONENTS (NECESSARY)
Download, extract and install the x86 version of the OPC core components:
ADJUST DCOM SETUP (NECESSARY)
On a Windows Operating System that is not customized DCOM is enabled by default.
Either click on Start->Programs->Administrative Tools->Component Services or Start->Run and type in dcomcnfg and click OK.
Expand Component Services->Computers->My Computer
Right click My Computer select Properties
Open tab 'Default Properties'
Make sure that 'Enable Distributed COM on this computer' is checked
Next open tab 'COM Security' and, in section 'Access Permissions' click 'Edit Limits'
Check Allow Local and Remote Access for users 'Everyone' and 'ANONYMOUS LOGON' (If the users are not shown click Add...), click OK
Click 'Edit Default', set the same permissions and click OK
In section 'Launch and Activate Permissions' click ''Edit Limits' and check Allow Local & Remote Launch and Local & Remote Activation for users 'Everyone' and 'ANONYMOUS LOGON'
Click 'Edit Default', set the same permissions, click OK followed by Apply
Restart your PC
Important: In case your controller runs Operating System Windows NT 4.0 you mandatorily have to set 'Default Authentication Level' in tab 'Default Properties' to 'None' otherwise you just get an 'Access denied' output from the test programs and the device drivers! You also have to reboot your PC for these changes to take effect.
ADJUST FIREWALL SETTINGS (OPTIONAL)
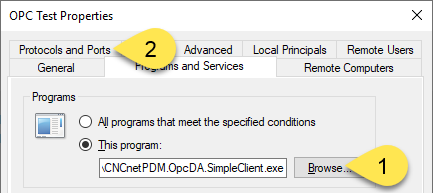
If you use a firewall on your PC or your company network disable it or, if not possible, add an exception for TCP Port 135 and an Inbound Rule that allows program CNCnetPDM.OpcDA.SimpleClient.exe or AEClient.exe (1) to use any port (2) as ports for OPC Classic communication are dynamically assigned by design (OPC Classic uses TCP Ports > 1000).
FIG 1: Firewall exception for program CNCnetPDM.OpcDA.SimpleClient
In the address field input two backslash characters followed by the IP Address or DNS Hostname of your controller e.g. \\192.168.1.100 and press Enter
You should be asked for credentials: Enter username ‘auduser’ and its password
If no errors show up you have successfully tested access to the device
If this does not work it may be that file sharing is not enabled at the controller. In this case run the DCOM test program
If running the DCOM test also failscheck if your controller is reachable via TCP Port 135 with our Device Port Scanner
In case access to TCP Port 135 fails perform the tasks in section controller setup
DCOM TEST
To test access to your controller’s OPC servers download and extract TestDCOM.exe and Config.ini to a folder of your choice at the PC. With a text editor such as notepad you can optionally edit Config.ini and change the IP Address right to ipaddr = to the IP Address of your controller. Save and close Config.ini.
Right click on TestDCOM with the shift key pressed, select ‘Run as different user’ and enter a . (dot) followed by a backslash and auduser (e.g. .\auduser) followed by its password.
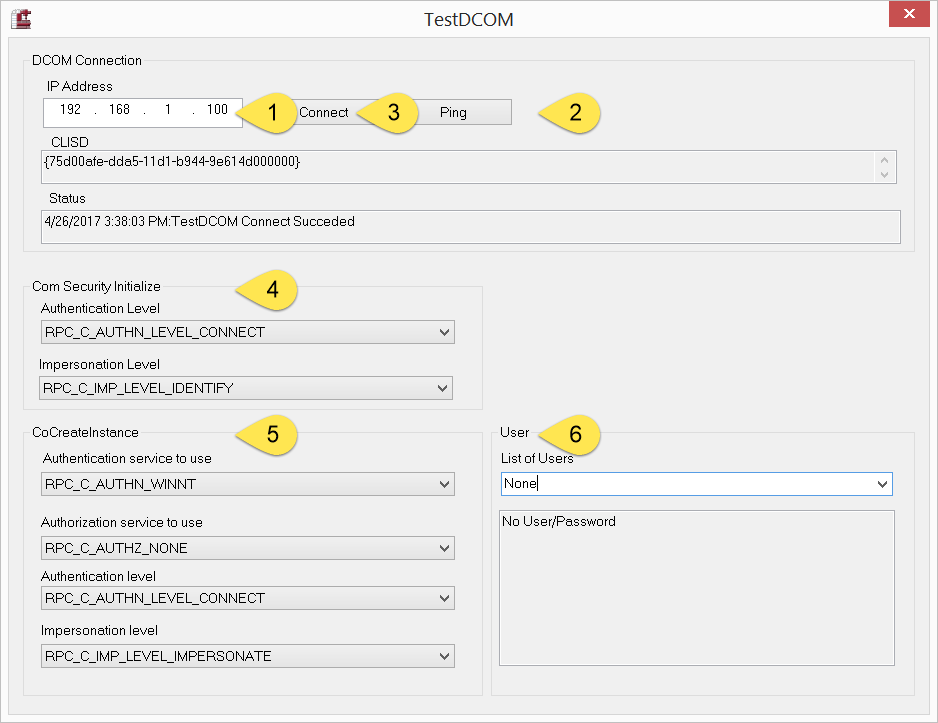
A dialog window opens:
FIG 3: TestDCOM dialog window
RUN TEST
On top enter the IP Address (1) of your controller
Click on button Ping (2)
Under Status you should see something like ‘… Reply from 192.168.1.100: bytes=14 time=
Next click on button Connect (3).
If it works you should see ‘…DCOM Connect Succeeded’.
All fields in sections ‘Com Security Initialize’ (4) and ‘CoCreateInstance’ (5) are preset with values that should work. So usually no changes have to be made here. Of course you can run tests with different parameters..
It is recommended that you turn off simple sharing: Click Start->Run type in eplorer.exe click on Tools->Folder Options. In tab View uncheck ‘Use simple file sharing (Recommended)’. Click OK.
Firewall settings (Controller)
If you have the firewall enabled at the controller proceed as follows: The most simple way to avoid communication problems is to turn off the firewall. Click on Start->Settings->Control Panel->Windows Firewall. Click on Off (not recommended) followed by OK. You’re done.
If you want to keep the firewall switched on you have to adjust some settings.
Add Port 135 to exceptions
Check ‘File and Printer Sharing’
DA: Add program ‘Simatic OPC Server’ (..\mmc2\opc\dataaccess\SOPC_MachineSwitch.exe)*
A&E: Add program ‘OPCSinumerikAlarm.exe’ (..\mmc2\opc\alarmevent\OPCSinumerikAlarm.exe)*
Click OK
* Depending on the setup of your controller these files may be stored at a different location.
FIG 4: Firewall settings on Sinumerik 840D
Restart the controller in normal mode to enable HMI again.
Privacy notice
This website uses cookies. By continuing to use it you agree to our privacy policy.